
Proper fit of the device into the user’s ear is critically important. Failure to fit the device correctly may result in permanent hearing loss and/or loss of situational awareness which could result in injury or death. If you are unable to attain a correct fit, discontinue use of this device. If, at any time during use, you experience ringing in your ears or loss of hearing, discontinue use immediately.
5.1 Fitting the Device in Your Ear
Complete ALL of the following steps, in order, to fit the CLEAR 360.
1. Attach the Medium size Ear Wings to the Ear Piece by pressing it onto the base of the post. When installed correctly, the wing will lock onto the tabs on the Ear Piece and will not be able to rotate. (See “4.1 Attaching Ear Wings”)
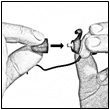
2. Attach the Medium size Foam Ear Tips to the Ear Piece by inserting the post on the Ear Piece into the center of the Foam Ear Tip. Press firmly until the post is fully inserted into the middle of the Foam Ear Tip as deep as possible. (See “4.2 Attaching Foam Ear Tips”)
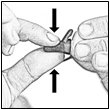
3. Press (squeeze) and slowly roll the Foam Ear Tip between your thumb and forefinger until the foam is fully compressed to the smallest possible size, resulting in a thin cylinder shape with no folds or creases.
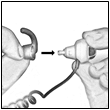
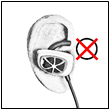
4. As quickly as possible before the Foam Ear Tip expands, position the Ear Piece so that the rounded part of the Ear Wing is facing upward and the front of the Ear Piece is facing the ground. Quickly insert the Foam Ear Tip into your ear canal as deeply as possible. Some users will find it beneficial to reach over their head with their opposite hand and pull the top of the ear upward and slightly outward while inserting the Foam Ear Tip. This helps to straighten the ear canal, facilitating insertion.
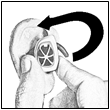
5. Rotate the Ear Piece backward in your ear until the Ear Wing is fully seated inside of the fold of your ear, which is the uppermost part of the bowl of your ear. Note: You may need to press on the Ear Wing with your finger to insert it fully.

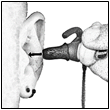
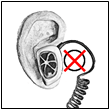
6. The Ear Piece will look like the bottom picture to the left when it is inserted properly. The Ear Wing will be fully seated into the fold of the ear, with its tip at the front fitting under the flap of your outer ear. Furthermore, the Ear Piece will be parallel to the ground with the wire exiting near the front.
7. Test for proper fit and a noise-blocking seal with the unit powered off and both ear pieces fitted. Loudly clap your hands next to your ear and listen to the sound level. If the Foam Ear Tips are the correct size and properly inserted, all outside sound should be significantly muted (reduced in loudness). If not, repeat all steps and follow the troubleshooting guide that follows.
5.2 Troubleshooting for Proper Fit
1. If the Ear Wing does not fully seat into the fold of the ear, the Ear Wing may be too large. Repeat “Fitting the Device in Your Ear” steps 1-7 using the Small size Ear Wing.
2. If the Ear Wing still does not fully seat into the fold of the ear, the Foam Ear Tip may be too large. Repeat “Fitting the Device in Your Ear” steps 2-7 using the Small size Foam Ear Tips. If the Ear Wing still does not fully seat, repeat “Fitting the Device in Your Ear” steps 2-7 using the Extra-Small size Foam Ear Tips.
3. If the Ear Piece can rotate in your ear or does not remain parallel to the ground, the Ear Wing may be too small. Repeat “Fitting the Device in Your Ear” steps 1-7 using a larger size of Ear Wing.